How To Set Up Sunny Boy Inverter On Arris Router Ethernet

Setting up a Sunny Boy inverter with an Arris router via Ethernet can seem like a technical challenge, but with the right steps and a bit of patience, it’s a relatively straightforward process. The Sunny Boy inverter, manufactured by SMA Solar Technology, is a key part of a solar power system that converts DC electricity generated by solar panels into AC electricity for use in your home or business. Integrating it with your Arris router via Ethernet allows you to remotely monitor and manage your solar system’s performance using SMA’s monitoring platform.
This article will walk you through the process of connecting your Sunny Boy inverter to the internet via Ethernet through an Arris router, enabling you to access real-time data on your solar energy production and consumption.
Prerequisites Before You Begin
Before you begin setting up your Sunny Boy inverter on your Arris router via Ethernet, ensure the following:
- Sunny Boy Inverter: Make sure the inverter is installed and powered on. If it’s not yet installed, you may need to refer to the manufacturer’s manual for installation.
- Arris Router: Your Arris router should be operational, with an available Ethernet port for connecting the Sunny Boy inverter.
- Ethernet Cable: You’ll need an Ethernet cable to connect the inverter to the router.
- SMA Monitoring Platform Account: To monitor your Sunny Boy inverter online, you’ll need to create an account on the SMA Sunny Portal or the relevant monitoring platform provided by SMA (for example, SMA Energy).
Once you have these prerequisites, you are ready to begin the setup process.
Step-by-Step Guide to Setting Up the Sunny Boy Inverter on Arris Router

Step 1: Connect the Sunny Boy Inverter to the Arris Router via Ethernet
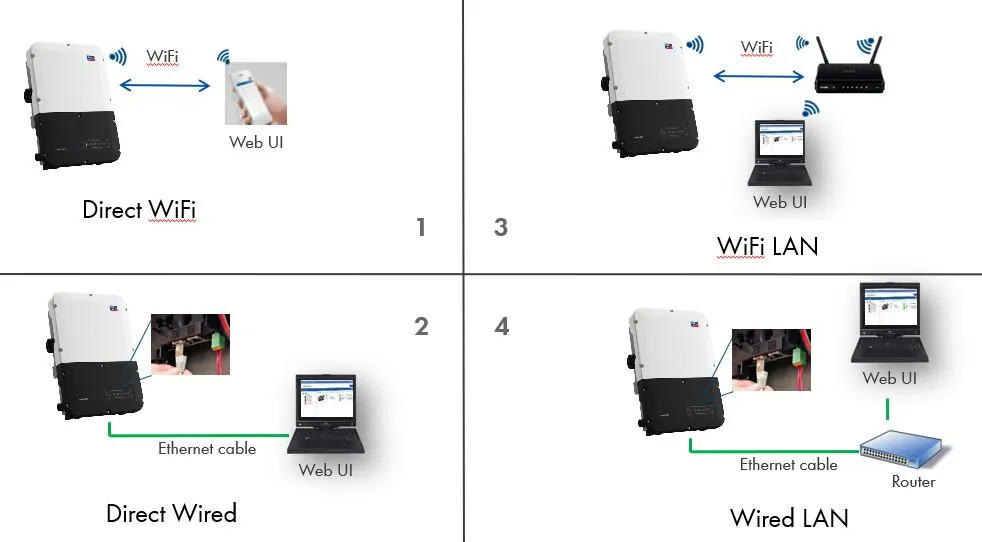
- Locate the Ethernet Port on the Inverter: On the front or side of the Sunny Boy inverter, you will find an Ethernet port. This is where you’ll connect your Ethernet cable. If your inverter has a Wi-Fi option, it may also support wireless configuration, but we will focus on the wired Ethernet setup.
- Connect the Ethernet Cable: Plug one end of the Ethernet cable into the Ethernet port on your Sunny Boy inverter and the other end into an available Ethernet port on your Arris router.
Step 2: Power On the Inverter
Ensure that the Sunny Boy inverter is powered on. There should be indicator lights showing that it is operational. If you’re unsure of the inverter’s status, refer to the LED indicator guide in the Sunny Boy manual for troubleshooting.
Step 3: Log Into the Arris Router Admin Panel
- Open a web browser on a device connected to the Arris router (laptop, smartphone, etc.).
- In the browser’s address bar, type the IP address of your router, which is typically 192.168.1.1 or 192.168.0.1. If neither of these work, consult your Arris router’s manual for the correct IP address.
- Enter the admin username and password for your router. If you haven’t changed the default login credentials, they should be available in the router’s manual or printed on a sticker on the device itself.
Step 4: Assign Static IP Address to the Sunny Boy Inverter (Optional)
While the Sunny Boy inverter will automatically attempt to connect to the router’s DHCP (Dynamic Host Configuration Protocol), some users prefer assigning a static IP address to the inverter for easier network management.
- In the router’s admin panel, navigate to the LAN Setup or Device Management section (the exact name may vary based on your Arris router model).
- Find the Sunny Boy Inverter: Under the “Connected Devices” or “Device List” tab, identify the Sunny Boy inverter by its MAC address or device name.
- Assign a Static IP: In some routers, you’ll have the option to assign a static IP address to the device. This ensures that the inverter always uses the same IP address for easier monitoring.
- If you prefer the default DHCP method, skip this step, and the router will automatically assign an IP address to the inverter.
Step 5: Configure the Sunny Boy Inverter to Connect to the Router
The Sunny Boy inverter needs to be properly configured to communicate with the internet through the Arris router.
- Access the Inverter’s Interface: Using a computer or mobile device connected to the same network, open a web browser and type the IP address of the Sunny Boy inverter (the static IP address if assigned, or the DHCP-assigned address). Refer to the inverter’s manual for how to locate the IP address of the inverter.
- Login to the Sunny Boy Web Interface: You may be prompted to log in with default credentials (typically found in the inverter’s manual). Change the default login if you haven’t done so already for security purposes.
- Configure Network Settings: In the inverter’s web interface, go to the Network Settings or Ethernet Configuration section. Ensure that the Ethernet option is selected, and confirm the device is set to obtain an IP address automatically from the router (unless you’ve assigned a static IP).
- Verify the Connection: Save the settings and restart the inverter. You should now see a notification on the inverter’s display indicating it has successfully connected to the network.
Step 6: Register the Inverter on the SMA Monitoring Platform
To monitor your solar production, you will need to register your Sunny Boy inverter with the SMA Sunny Portal or another SMA monitoring platform.
- Create an Account: Go to the SMA Sunny Portal website or use the app. Create an account if you don’t have one already.
- Add Your Inverter: Once logged in, navigate to the option to add a new device. Enter the serial number of your Sunny Boy inverter (found on the inverter’s label) and follow the prompts to complete the registration.
- Monitor Your System: After registration, you’ll be able to view real-time performance data, including energy production, consumption, and efficiency, from your Sunny Boy inverter.
Step 7: Check for Updates and Test the System
It’s always a good idea to check if your inverter’s firmware is up-to-date. Some versions of the Sunny Boy inverter may require updates to work properly with the monitoring platform.
- In the inverter’s web interface, check for any available firmware updates and follow the instructions to install them.
Step 8: Final Testing and Monitoring
Once the system is set up and the Sunny Boy inverter is connected to your Arris router via Ethernet, ensure everything is working smoothly. You can access the Sunny Portal or use the app to monitor the inverter’s performance. Verify that your solar system is producing energy and that data is being transmitted correctly to your online account.
Troubleshooting Tips

- No Connection: If the Sunny Boy inverter isn’t connecting, ensure the Ethernet cable is securely plugged in and the router is functioning properly. Check for any errors in the router’s DHCP settings.
- IP Address Issues: If you’re using a static IP address and can’t connect, make sure the IP address is in the correct range for your network and not conflicting with another device on the network.
- Inverter Not Showing Data: If the inverter is not showing any data in the monitoring portal, confirm that the inverter is correctly connected to the internet and the SMA platform.
Conclusion
Setting up a Sunny Boy inverter on an Arris router via Ethernet is a manageable process that offers the benefits of remote monitoring and management for your solar power system. With proper connection and configuration, you’ll have access to valuable insights into your system’s performance, enabling you to optimize energy production and consumption. By following the steps outlined above, you’ll be up and running in no time.
If you encounter any issues, always refer to the user manuals of both the Sunny Boy inverter and the Arris router, or consult SMA’s customer support for further assistance.


